Today I am going to show you how to layout a UITableViewCell in Interface Builder and have a UITableView populate with those type of cells. I am Adopting a new structure for my screencasts whichwill be 5 or so mintues of keynote slides giving background info, followed by 20 to 25 mintues of step by step development.The entire video will be directly below this paragraph, but scrolling down you will see a text-based step by step tutorial of the whole as well. Hope you guys enjoy.
Skill level MEDIUM
Here is a link to the screencast to watch. We are working on getting an embedded version in, but I figure this is basically just as functional. Have fun!
Custom UITableViewCell screencast video
Source Code
Available Here
Background Information


Building the app
Step 1

This step should not require any additional information.
Step 2


Step 3

In CustomTableCellTutorialViewController.m you must define the two required UITableViewDataSource methods. These methods will fill up the tableView with data. For now we will put in dummy data just to make sure all of our connections are working.
- (NSInteger) tableView: (UITableView *) tableView numberOfRowsInSection: (NSInteger) section
{
return 10;
}
- (UITableViewCell *) tableView: (UITableView *) tableView cellForRowAtIndexPath: (NSIndexPath *) indexPath
{
static NSString * Cell Identifier = @ "Cell";
UITableViewCell * cell = [tableView dequeueReusableCellWithIdentifier: Cell Identifier];
if (cell == nil) {
cell = [[[UITableViewCell alloc] initWithFrame style: UITableViewCellStyleDefault reuse identifier: Cell identifier] autorelease];
}
[Cell setText: [NSString stringWithFormat: @ "I am cell% d", indexPath.row]];
return cell;
}
Step 4
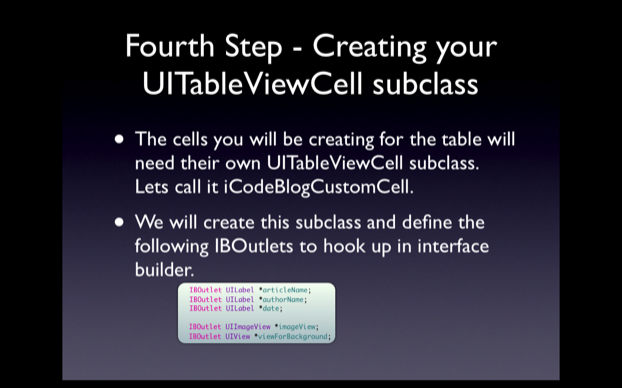
Here you will need to be in xCode and go to File -> New File ...
Select Objective-C class and make sure it is a UITableViewCell subclass, Depending on your version of the SDK selecting this will differentiate. Look around and you will find it, call it iCodeBlogCustomCell. With this done IBOutlets enter these in the iCodeBlogCustomCell.h IBOutlets file enter the following:
IBOutlet UILabel * articlename;
IBOutlet UILabel * author name,
date IBOutlet UILabel *;
IBOutlet UILabel * author name,
date IBOutlet UILabel *;
IBOutlet UIImageView * imageView;
IBOutlet UIView * viewForBackground;
IBOutlet UIView * viewForBackground;
Add the @ property and synthesize them in the main.
Step 5

This step does not require and code but does require a lot of work in Interface Builder. I highly recommend you watch the screencast to see the step by step procedure here. Essentially what I do is create a new View XIB file. Opening this, I delete the standard UIView in the XIB and drag a UITableViewCell from my library into my document window. I assign the UITableViewCell to be of type iCodeBlogCustomCell. With this done the layout interface with the proper elements and hook them up by right clicking on the UITableViewCell in the document window.
Step 6

This is where the real magic is. We are going to return to and edit the CustomTableCellTutorialViewController.m UITableViewDataSource methods we implemented earlier. The code I use has me putting in 4 separate PNG files that I add to my project. You can find your own to put inside the cells. Make sure the UIImageView inside the cell is set for Aspect Fit so you do not have to worry about resizing the images. The functions should be changed to be:
- (NSInteger) tableView: (UITableView *) tableView numberOfRowsInSection: (NSInteger) section
{
return 100;
}
{
return 100;
}
- (UITableViewCell *) tableView: (UITableView *) tableView cellForRowAtIndexPath: (NSIndexPath *) indexPath
{
static NSString * Cell Identifier = @ "iCodeBlogCustomCell";
{
static NSString * Cell Identifier = @ "iCodeBlogCustomCell";
iCodeBlogCustomCell * cell = [tableView dequeueReusableCellWithIdentifier: Cell Identifier];
if (cell == nil) {
printf ("New CellMade");
printf ("New CellMade");
NSArray * topLevelObjects = [[NSBundle mainBundle] loadNibNamed: @ "iCodeBlogCustomCell" owner: nil options: nil];
for (id in topLevelObjects current object)
{
if ([[iCodeBlogCustomCell class] isKindOfClass current object])
{
cell = (iCodeBlogCustomCell *) current object;
; break
}
}
}
{
if ([[iCodeBlogCustomCell class] isKindOfClass current object])
{
cell = (iCodeBlogCustomCell *) current object;
; break
}
}
}
if (indexPath.row% 4 == 0)
{
[[cell authorName] setText: @ "Collin Ruffenach"],
[[cell articlename] setText: @ "Test Article 1"],
[[cell date] setText: @ " May 5th, 2009 "],
[[cell imageView] setImage: [UIImage imageNamed: @ "1.png"]];
}
{
[[cell authorName] setText: @ "Collin Ruffenach"],
[[cell articlename] setText: @ "Test Article 1"],
[[cell date] setText: @ " May 5th, 2009 "],
[[cell imageView] setImage: [UIImage imageNamed: @ "1.png"]];
}
(indexPath.row% 4 == 1) else if
{
[[cell authorName] setText: @ "Steve Jobs"],
[[cell articlename] setText: @ "Why iPhone will rule the world"],
[[cell date] setText: @ "May 5th, 2010"],
[[cell imageView] setImage: [UIImage imageNamed: @ "2.png"]];
}
{
[[cell authorName] setText: @ "Steve Jobs"],
[[cell articlename] setText: @ "Why iPhone will rule the world"],
[[cell date] setText: @ "May 5th, 2010"],
[[cell imageView] setImage: [UIImage imageNamed: @ "2.png"]];
}
else if (indexPath.row% 4 == 2)
{
[[cell authorName] setText: @ "The Woz"],
[[cell articlename] setText: @ "Why I'm coming back to Apple"],
[[cell date] setText: @ "May 5th, 2012"],
[[cell imageView] setImage: [UIImage imageNamed: @ "3.png"]];
}
{
[[cell authorName] setText: @ "The Woz"],
[[cell articlename] setText: @ "Why I'm coming back to Apple"],
[[cell date] setText: @ "May 5th, 2012"],
[[cell imageView] setImage: [UIImage imageNamed: @ "3.png"]];
}
else if (indexPath.row% 4 == 3)
{
[[cell authorName] setText: @ "Aaron Hillegass"],
[[cell articlename] setText: @ "Cocoa: A Brief Introduction"],
[[cell date] setText: @ "May 5th, 2004"],
[[ cell imageView] setImage: [UIImage imageNamed: @ "4.png"]];
[[cell authorName] setText: @ "Aaron Hillegass"],
[[cell articlename] setText: @ "Cocoa: A Brief Introduction"],
[[cell date] setText: @ "May 5th, 2004"],
[[ cell imageView] setImage: [UIImage imageNamed: @ "4.png"]];
}
return cell;
}
}
The End
So that is it for my first new post I will be doing many more. Let me know your thoughts on this format in the comments. If you see anything wise organization that you think should be changed / add / removed let me know. Good Luck!
No comments:
Post a Comment